Here you will find all the reference information on Imgbot. Anything you need to know about how it works or how to contribute can be found below.
Imgbot <3 contributions.
All of the Imgbot documentation is checked into GitHub. If there is any issue or something that is missing please feel free to open an issue and/or a pull request to get it fixed up.
Images are one of the key parts of almost any website or application, but they also play a really big role in performance degradation. The more images you have, the slower your load times can become.
There are a lot of tactics for updating your images to be more performant like cropping and resizing, but running a lossless compression is something you should always do to optimize the delivery without sacrificing size or quality.
Imgbot does just that and takes the heavy lifting out for you. With just a couple of clicks you can get Imgbot running in your project's repo on GitHub and sending you pull requests with your images optimized.
As you continue making further optimizations to the design and delivery of your application, Imgbot will be there optimizing your images for you the whole time.
Some of Imgbot's core features are as follows:
Imgbot uses compression algorithms to optimize images, and by default LosslessCompress() is used.
This means that while the file size is going down, the quality and dimensions remain intact.
When configuring your setup, you can choose between non-aggressive LosslessCompress() and aggressive LossyCompression() compression.
To provide the strong optimization, Imgbot utilizes multiple compression algorithms, and these are currently implemented:
The images are compressed in place after cloning the repo, and once installed into any repo, Imgbot will run the LosslessCompress() routine on an ongoing basis and open PRs to keep your images optimized.
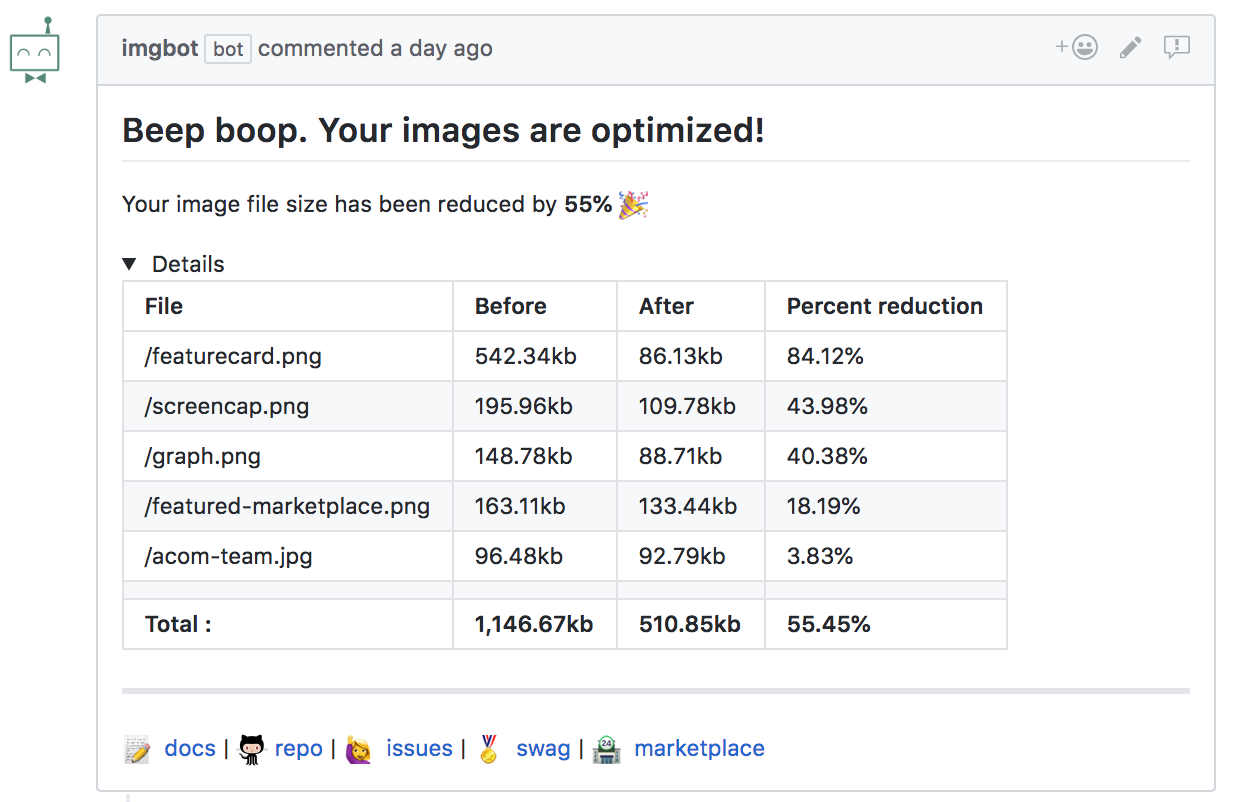
The file size is measured before and after compression and the results are reported in the commit message body, to keep you updated.
Imgbot supports optional configuration through a .imgbotconfig json file.
This is not a required step to using Imgbot and is only for more advanced scenarios.
This file should be placed in the root of the repository and set to your liking. See this past issue for details about the location for this file.
Here is an example .imgbotconfig setup that shows some of the options.
{
    "schedule": "daily", // daily|weekly|monthly
    "ignoredFiles": [
        "*.jpg",                   // ignore by extension
        "image1.png",              // ignore by filename
        "public/special_images/*", // ignore by folderpath
    ],
    "aggressiveCompression": "true", // true|false
    "compressWiki": "true", // true|false
    "minKBReduced": 500, // delay new prs until size reduction meets this threshold (default to 10)
    "prTitle" : "Your own pr title",
    "prBody" : " Text before optimization ratio {optimization_ratio} Text after optimization ratio
                 Text before optimization details {optimization_details} Text after optimization details",
}
Outside of the .imgbotconfig file, there are additional settings that can be configured by logging in to
the website. This is the current list of settings supported in this UI:
If there are any configuration settings you would like to see supported, please feel free to open an issue in the repo or shoot an email over to help@imgbot.net
You can set a schedule for your Imgbot PRs through the .imgbotconfig file.
This will effectively set the maximum frequency of pull requests submitted from Imgbot to your repo. This is ideal for projects that receive many image updates and don't want to see optimizations until they can all be batched up together. Most projects will benefit the most form the default setting of receiving image optimizations from Imgbot as new images are added to the project.
If you do want to set a schedule for Imgbot pull requests the current supported values are 'daily', 'weekly', and 'monthly'.
.imgbotconfig
{
    "schedule": "weekly"
}
Some users may want to keep some images from being optimized. There can be a variety of reasons to want to keep an image in it's original state that differ from project to project.
If this is something you need in your project, Imgbot offers an ignore option.
.imgbotconfig
Ignoring by extension
"ignoredFiles": [
    "*.jpeg"
]
Ignoring all images in a specific folder
"ignoredFiles": [
    "public/special_images/*"
]
Ignoring individual image files
"ignoredFiles": [
    "special-image1.png",
    "other-image1.png"
]
Ignoring nested folders
"ignoredFiles": [
    "**/test_images/**"
]
Ignoring paths that start with a pattern
"ignoredFiles": [
    "path/to/prefix*"
]
You can maximize Imgbot's compression through the .imgbotconfig file.
.imgbotconfig
Using full compression capabilities
{
    "aggressiveCompression": true
}
Using lossless compression (default)
{
    "aggressiveCompression": false
}
If your repository has a wiki with images, you can opt in to optimize these images as well as your code repo.
All of the images in the wiki will be updated directly on the default branch. This is due to the lack of branch management and no pull requests available within GitHub wikis.
By adding compressWiki in the .imgbotconfig file as displayed below, you will enable this feature.
{
    "schedule": "daily", // daily|weekly|monthly
    "ignoredFiles": [
        "*.jpg",                   // ignore by extension
        "image1.png",              // ignore by filename
        "public/special_images/*", // ignore by folderpath
    ],
    "aggressiveCompression": "true" // true|false
    "compressWiki": "true" // true|false
}
You can set a space saved threshold using the .imgbotconfig file.
"minKBReduced": 500 for a 500 KB threshold).imgbotconfig
Setting 500 KB threshold
{
    "minKBReduced": 500
}
To disable this threshold and always open a PR no matter how much size is reduced unset the default
{
    "minKBReduced": null
}
You can set a pull request title for your Imgbot PRs through the .imgbotconfig file.
.imgbotconfig
{
    "prTitle": "My title"
}
You can set a pull request body for your Imgbot PRs through the .imgbotconfig file.
.imgbotconfig
{
    "prBody" : " Text before optimization ratio {optimization_ratio} Text after optimization ratio
                 Text before optimization details {optimization_details} Text after optimization details",
}
After you install Imgbot into your repo, this is registered with GitHub and you are issued an InstallationID. Imgbot itself has an ApplicationID and a private key that is kept secret. With a combination of the InstallationID, the ApplicationID, and the private key, Imgbot can request an Installation Token from GitHub.
This Installation Token is valid for 10 minutes at a time and provides the permissions agreed to at the time of installation. If the permissions required by Imgbot change you will be notified and have to accept before they can take effect.
Imgbot specifically uses this Installation Token to clone the repo, create a branch, push a commit to the branch, and open pull requests. These actions are performed on behalf of the installation with a username of 'x-access-token' and a password set to the value of the Installation Token.
The author and committer for these actions are set to ImgBotApp<ImgBotHelp@gmail.com>.
Furthermore, the commits pushed by Imgbot are digitally signed with a secure and registered PGP private key and password and verified against a public key registered with GitHub. This verification provides an extra level of security to ensure that commits that come into your repo are in fact coming from the authentic Imgbot. And you get the nice green verified badge in the PR.
If at anytime you want to remove Imgbot's ability to interact with your repo, you simply uninstall the application from your settings and all further action's will be immediately blocked with no access.
The following permissions are required for Imgbot to function:
The metadata access includes "Search repositories", "List collaborators", and "Access repository metadata". See the GitHub documentation for more information.
The code access is required to clone the repo, create a branch, and push a commit.
The pull requests access is required to open the actual pull request.
All the code for Imgbot is available on GitHub. We will gladly accept contributions for the service, the website, and the documentation. If you are unsure what to work on, but still want to contribute you can look for an existing issue in the repo.
The following is where you can find out how to get set up to run locally as well as detailed information on exactly how Imgbot works.
The core of Imgbot runs on a serverless stack called Azure Functions. The Function apps are running the image compression, pushing the commits, and opening the Pull Requests. Once you get the tools you need to work with Azure functions you can run the apps locally.
You can either get the tools integrated with Visual Studio and use F5
or you can get the CLI standalone and use func run Imgbot.Function.
If you are using Visual Studio for Mac there is built-in support for Azure functions.
We also have support for running with VS Code. You will still need to get the CLI as mentioned above and the C# extension for VS Code in order to compile and get intellisense.
Each function has a task you can execute that will clean + build + run the process. To start one open the prompt with cmd/ctrl + shift + p and select Run task. From there you will see all the tasks checked into .vscode/tasks.json. Choose a function to run such as Run CompressImagesFunction and it will build and start up. To attach to this process choose the Debug a function configuration from the debug tab to see the running processes. Type func into the picker to see your running function and select it. It's a two-step process, the debugger and the function process. When you kill the debugger, the process will still be running. You can kill the function host by bringing up the prompt again with cmd/ctrl + shift + p and select Kill the active terminal instance.
Azure Functions operate on top of storage. To run the function locally you will need to bring your own storage account and add a local.settings.json in the root with AzureWebJobsStorage filled out and FUNCTIONS_WORKER_RUNTIME set to dotnet.
You can see the schema of this file in the doc
Alternatively, running func init from the function directory will stamp out everything for you, or if you have a deployed function you can fetch the storage it is using.
func azure functionapp fetch-app-settings <functionName>
If you don't want to compile and run the CompressImagesFunction directly, you can use docker. See the image on dockerhub.
There are a few additional environment settings that need to be set to run the compression workflow. These can be set with local.settings.json or any other way
Now that you are running the service locally, within the root of the repo you will see the following directories:
CompressImagesFunction - The function that does the work of cloning, compressing, and pushing commitsInstall - The shared library to provide Installation Tokens to the functionsOpenPrFunction - The function that opens Pull RequestsRouterFunction - The orchestration layerWebHook - The function that is triggered from GitHub activityThe following file locations may be helpful if you are looking for specific functionality:
CommitMessage.cs - generation of commit message compression reportCompressImages.cs - clones the repo, compresses the images, pushes the commitCommitSignature.cs - uses a pgp private key and password to sign a commit messageImageQuery.cs - searches and extracts all the images out of the repo to be optimizedInstallationToken.cs - uses a pem file and the GitHub API to get access to reposLocalPath.cs - generates the location to clone fromPullRequest.cs - opens the pull request and sets the title and descriptionSchedule.cs - logic to limit the frequency of Imgbot PRsWebHookFunction.cs - reads the GitHub hook messages and kicks off tasksImgbot uses QueueTriggers to kick off workflows.
The triggers in place today are routermessage, openprmessage, compressimagesmessage.
Imgbot also uses an HttpTrigger as the entry point for the service.
Imgbot uses LibGit2Sharp to perform all the git operations.
The following is the high-level workflow for the CompressImagesFunction:
The clone directory is read from environment variable %TMP% or falls back to /private/tmp/ if this environment variable is not set.
Once the branch is pushed, Imgbot uses Octokit to create the pull request in GitHub.
Imgbot uses BouncyCastle to help generate an installation token.
This requires a combination of a Private Key, an App Id, and an InstallationId to generate a token to be used on behalf of the installation.
The benefit of using installation tokens is that the user is in full control of the permissions at all times. We never have to store any tokens and they expire after about 10 minutes.
The installation token serves as a password to clone private repos, push to remotes, and open pull requests.
The username to accompany the installation token password is x-access-token.
For security reasons, we cannot provide contributors with a pem file as this is a secret that delegates permissions in GitHub. You can run every part of the function except parts where authentication is required without this secret. If you are working on a part of the function that requires this secret then you can generate one for yourself to test with. Register a GitHub app for development purposes and install this app into the repo you are using to test with. Set the AppId in the code and you should be good to go.
If there is a part of this process that isn't clear or you have any questions at all feel free to open an issue in this repo and we'll work it out :)
This Schedule class is responsible for throttling optimization routines. Imgbot is triggered when there is a new image added to a repo and by default will submit a PR as soon as it can.
Some users prefer to defer the pull requests and do the optimization in bigger batches. This is implemented by offering three options 'daily', 'weekly', and 'monthly'.
Imgbot will check the commit log to find the last time we committed an optimization. If it has been long enough since Imgbot has last committed in this branch then we will try to optimize the images again. Otherwise we will skip running optimizations for this run.
Imgbot uses a standard commit title and generates a report of the image optimizations to be used in the commit message body.
The input is a dictionary where the key is the filename and the value is a pair of numbers that represent file size before and after compression.
This dictionary is transformed into an optimization report in the form of a commit message.
Imgbot locates all the images that are to be sent through the optimization routine with file directory access against a local clone.
The known image extensions are used to find all the images recursively and the ignored files from imgbotconfig are parsed.
For each execution, Imgbot generates the folder for the git operations to take place in.
Today this is done by combining the name of the repo with a random number.
The 2 main events we deal with through webhooks are installation events and push events.
Each time a repo has Imgbot installed, GitHub fires a hook to WebHookFunction.cs and we start the installation workflow.
Each time a repo that already has Imgbot installed gets pushed to, GitHub fires a hook to WebHookFunction.cs and, if the commit contains an image update, we start the compression worflow.
The frontend that drives https://imgbot.net/ is a generated static web app built with Grunt and a little bit of JavaScript. This static site is generated to be completely stand alone and hosted on a CDN for caching worldwide. The grid system for the Imgbot site is bootstrap 4. The purpose of this website is to run the landing page and docs for Imgbot.
You will find the package.json file for the website in the Web/ directory of the repo. From here the input files live in the src/ directory and the generated site is output to the dist/ directory and git-ignored.
To kick off the generation
npm run gen
To start a lightweight dev server at http://localhost:8888
npm run serve
To compile the site on save
npm run watch
Within the Web/ directory you will see the following key files
src/index.html - the landing page markupsrc/docs/layout.jst - the docs page templatesrc/layout.jst - the layout for the landing pagessrc/css/site.less - the landing page stylesheetgruntfile.js - the task configuration for generating and serving the siteThe docs are published from checked in markdown files to the Imgbot website to view in a browser. Alternatively, the docs can be browsed and edited within GitHub.
When the docs are compiled to HTML they use the layout and metadata found in the Web/src/docs directory. The metadata.json file here will define the order and title of each doc. For example:
{
    "slug": "contributing-website",
    "title": "Contribute to Imgbot website"
}
The slug matches the name of the markdown file and also drives the URL segment to browse this doc.
This metadata file is read within the Web/tasks/compile-docs.js file. This is a custom grunt task that arranges all the documentation.
The template that renders the documentation is Web/src/docs/layout.jst. This is a template file that renders the documentation navigation and content as HTML.
Imgbot uses VSTest with NSubstitue to manage unit testing of the logic within the Imgbot codebase. The tests live in the Test directory. Please do your best to add tests as new features or logic are added so we can keep Imgbot running smoothly. :)